
Overview
House Accounts allow customers to have an account with a restaurant (like a Gift Card) but functions like a credit card, where there is a limit and a balance. When purchases are made, the balance of the account grows and when payments are made, the balance goes down. To begin adding house accounts to the system, house account types and customers must first be created so that there is a particular customer associated with the account.
Create House Account Types
Log onto http://onemetrix.com/ using the Serial Number of the site, and the user/pass on the setup sheet that was emailed. (unless this has been changed by the administrator already). Log in with the Administrator role. Select the House Accounts tab at the top. Under Setup/Utilities on the tree to the left, there is a House Account Types option. Click this option and you will see that there is a type included in the setup called Main, which is a default type in the system. You can alter this type if you like, and add new types through this interface. There are various options you can set up; the options that are currently supported include the following items.
Info
Description: The name of the type.
Tipable: Whether or not the type is tipable (tip can be applied for this type). Rechargable: When checked, you can add value to this card after the value becomes zero, and it will remain as the same gift card account.
Recharge Refresh: When checked, this will allow the card to have value added it after it expires, and the expiration will then auto-renew.
Renewable: When checked, you can add value to this card after the value becomes zero, but it will become a new gift card account.
NOTE: If both Rechargable and Renewable are checked, the card type will be Rechargable (it overrules the lower checkbox).
Allow Overpay: When checked, the customer can pay past the zero balance to have a negative balance(credit).
Max Amount: The maximum value that can be assigned to this card type.
Max Cash Back: The maximum amount of cash back that can be accessed from the card.
Auto Fee: This is a fee that can be applied to all accounts of this type when you select Apply Service Fee on the tree to the left under Setup/Utilities.
Auto Fee After Days: This is the number of days since the accounts were last used that the fee from the above operation will be applied to.
So when these two values are set, for instance, I have accounts of a certain type that has an Auto Fee of 10.00 dollars and Auto Fee After Days of 30. When I click the Apply Service Fee, all accounts of this type will be charged $10 if they have not used the account in the last 30 days.
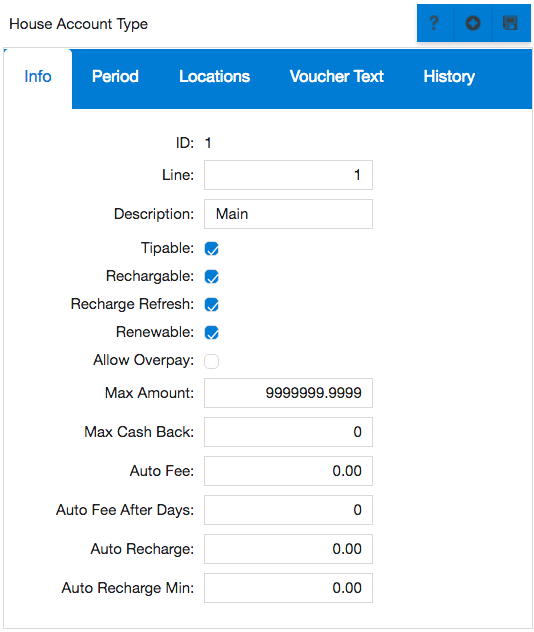
If I set Auto Recharge to 10 dollars and Auto Recharge Min to 20 dollars, all accounts that have a balance over $20 will have a credit of $10 applied to the balance of the accounts for this type when I click on Apply Auto Recharge in Setup->Utilities.
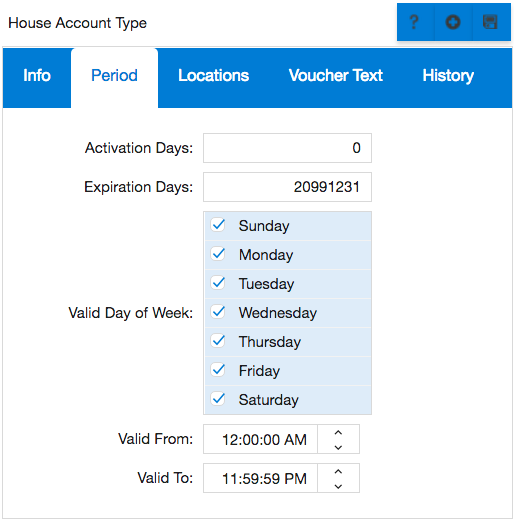
Period
Activation Days: The number of days it takes for the account to become active. Expiration Days: This value can be a date in the format of YYYY-MM-DD when the account expires or it can be a number of days that the card will expire from the activation date. If activation is set to 0, the account becomes automatically active, and if expiration is set to 30, the account will expire 30 days after it is activated.
Valid Day of Week: The days of the week the account can be used. Valid From/Valid To: Times the account can be used.
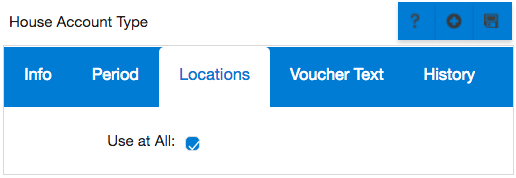
Locations
This applies to group sites that may want to prohibit certain account types from being used at other locations. Uncheck Use at All, and check the boxes of the locations that will allow accounts of this type to be used. After you finish setting up an account type, save your work by clicking the Save button on the top.
Create House Accounts
To begin, continue by selecting the House Accounts tab at the top. Click the “+” symbol next to “Show Inac” which is the “Add New Item” button on the House Accounts list to add a new account.
You will see an interface for adding a new customer. If you have already created the customer, you can select Existing Customer and search for the customer by Email, Company Name or Name. Once you enter in the information for the customer, click OK.
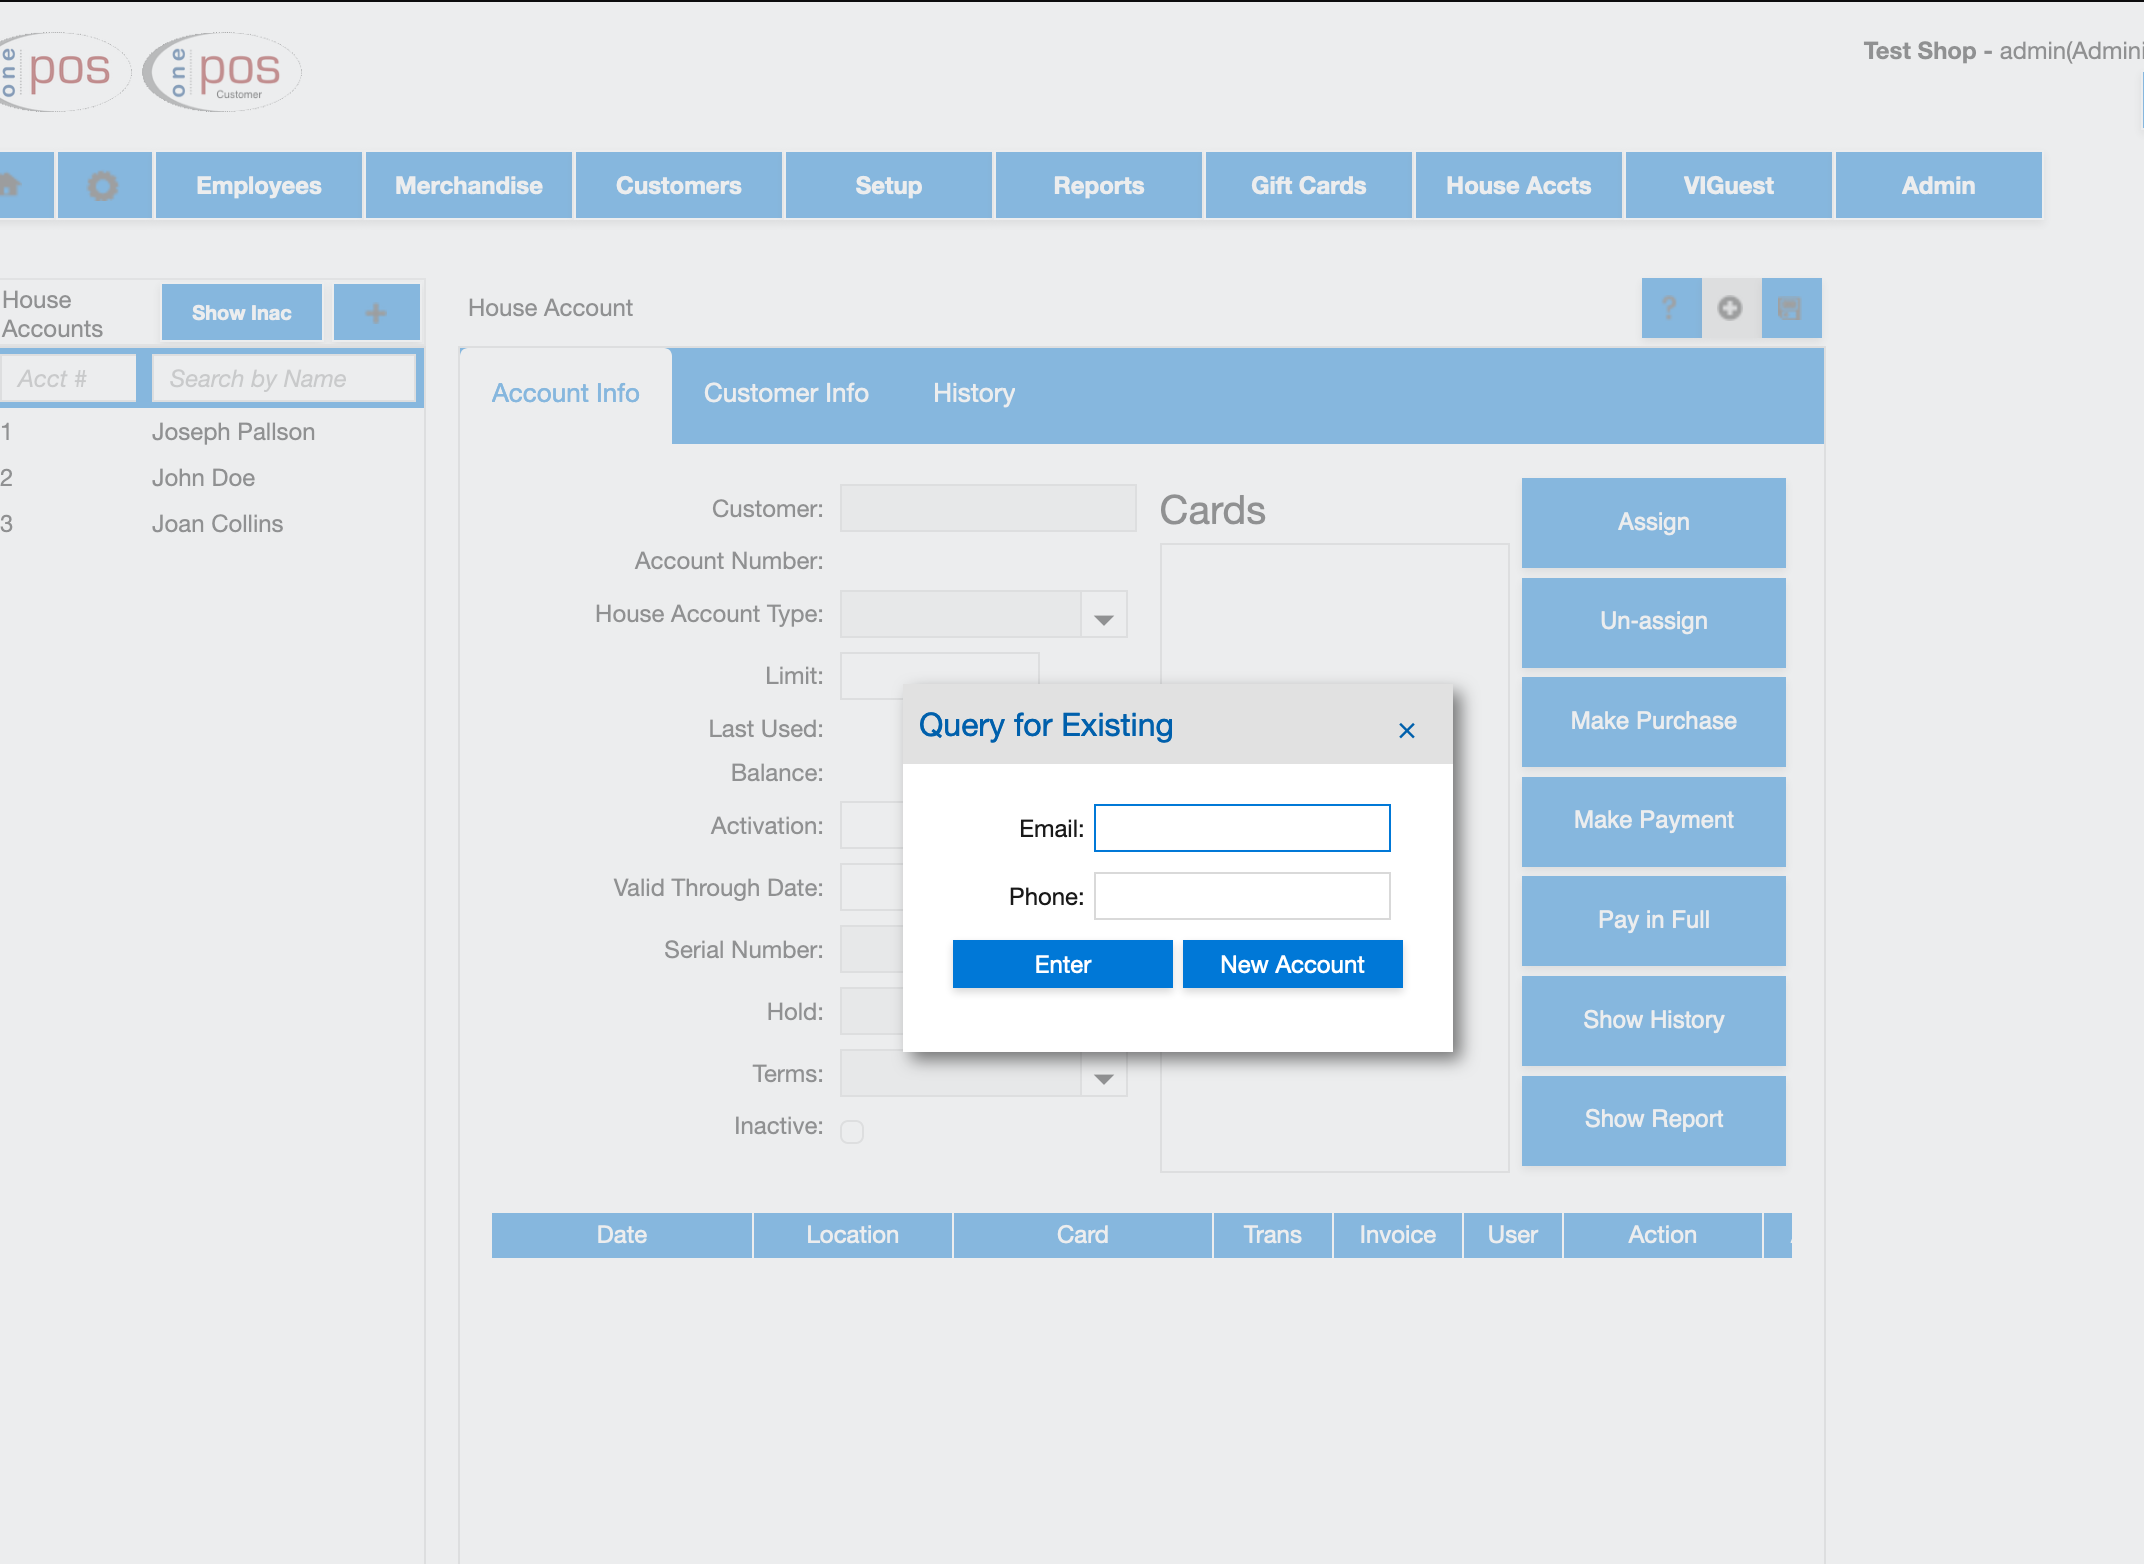
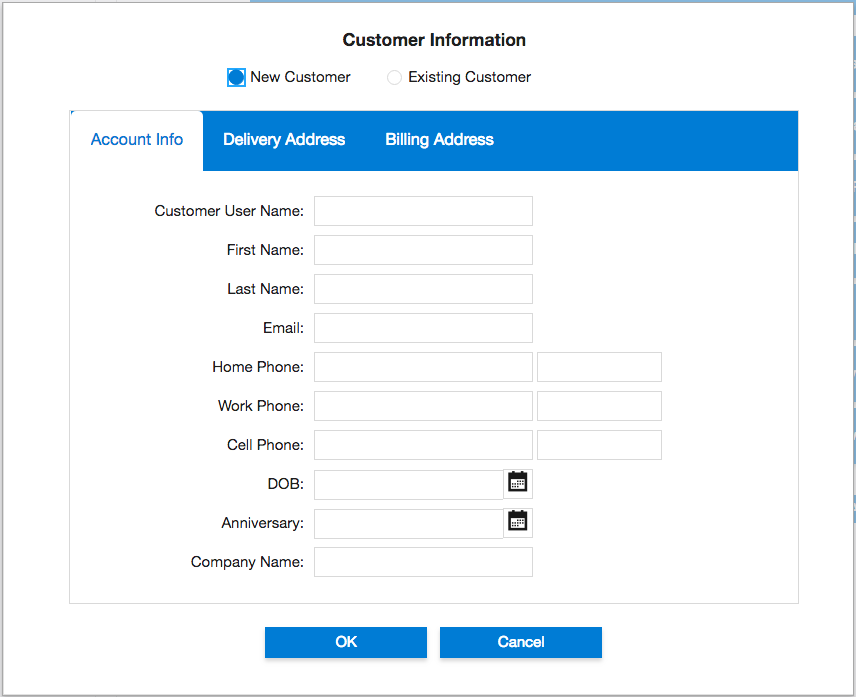
A dialog for entering in the account information for this customerʼs account will appear. Enter in the following fields:
House Account Type: The type that this account will be.
Limit: A number greater than 0 that will be the Max Amount allowed on the account. Serial Number: For a group site, you can select the Serial Number that will own the account. In most cases, the Serial Number will be the site that you are logged into.
Hold: This is currently not being used in the system yet, but a value should be selected. Terms: This is currently not being used in the system yet, but a value should be selected.
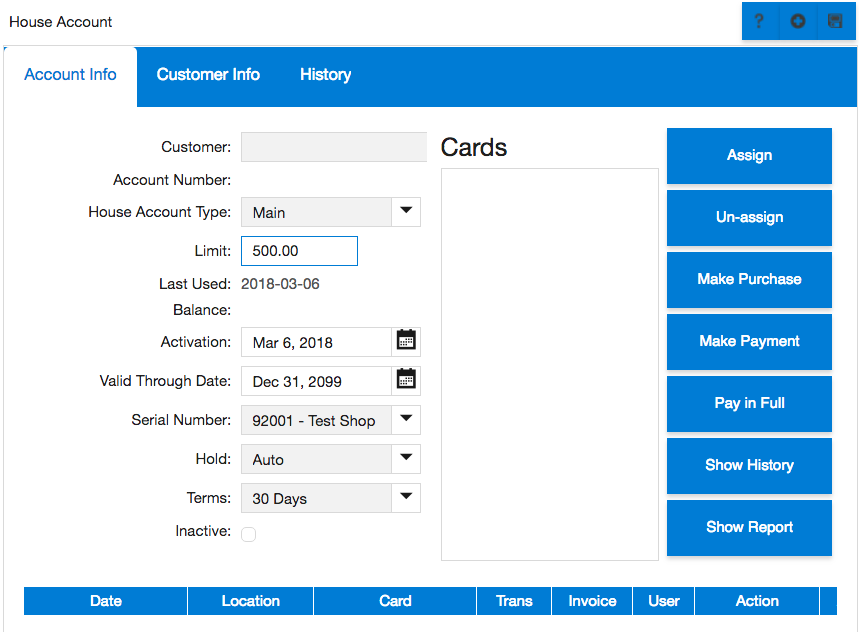
After you enter in the Account Info, click the Save button at the top of the panel to add the account. The screen will refresh and you will see your new account in the list to the left.
Assign/Un-assign/Link/Un-link Cards to Accounts
Assigning a card to an account means that a card that adheres to the specification defined for House Accounts set up in the Manager Console will be added to an account. This card can be used to perform transactions for the account. Un-assigning means that this type of card is removed from the account. Linking a card to an account means that this is a card that can be used to locate a house account in the system. This card can NOT be used to perform transactions; it is only a card that is used to locate an account in the system. Unlink means that the card will no longer be used to locate an account.
Assign New Card:
Select the account you want to add a card to and observe the Cards section on the right side of the account panel. Click Assign/Link to add a new card for this account. In the Card window, you can manually enter a card number (such as 1 or 2) or scan a card that adheres to the format specified in the House Account Card Spec. Click Save and the card will be added to the account.
Un-assign Existing Card:
Click Un-assign/Unlink to remove an existing card for this account. In the Card window, you can select a card from the drop down to un-assign or you can enter or scan (like performed in assigning). Click Save and the card will be removed from the account.
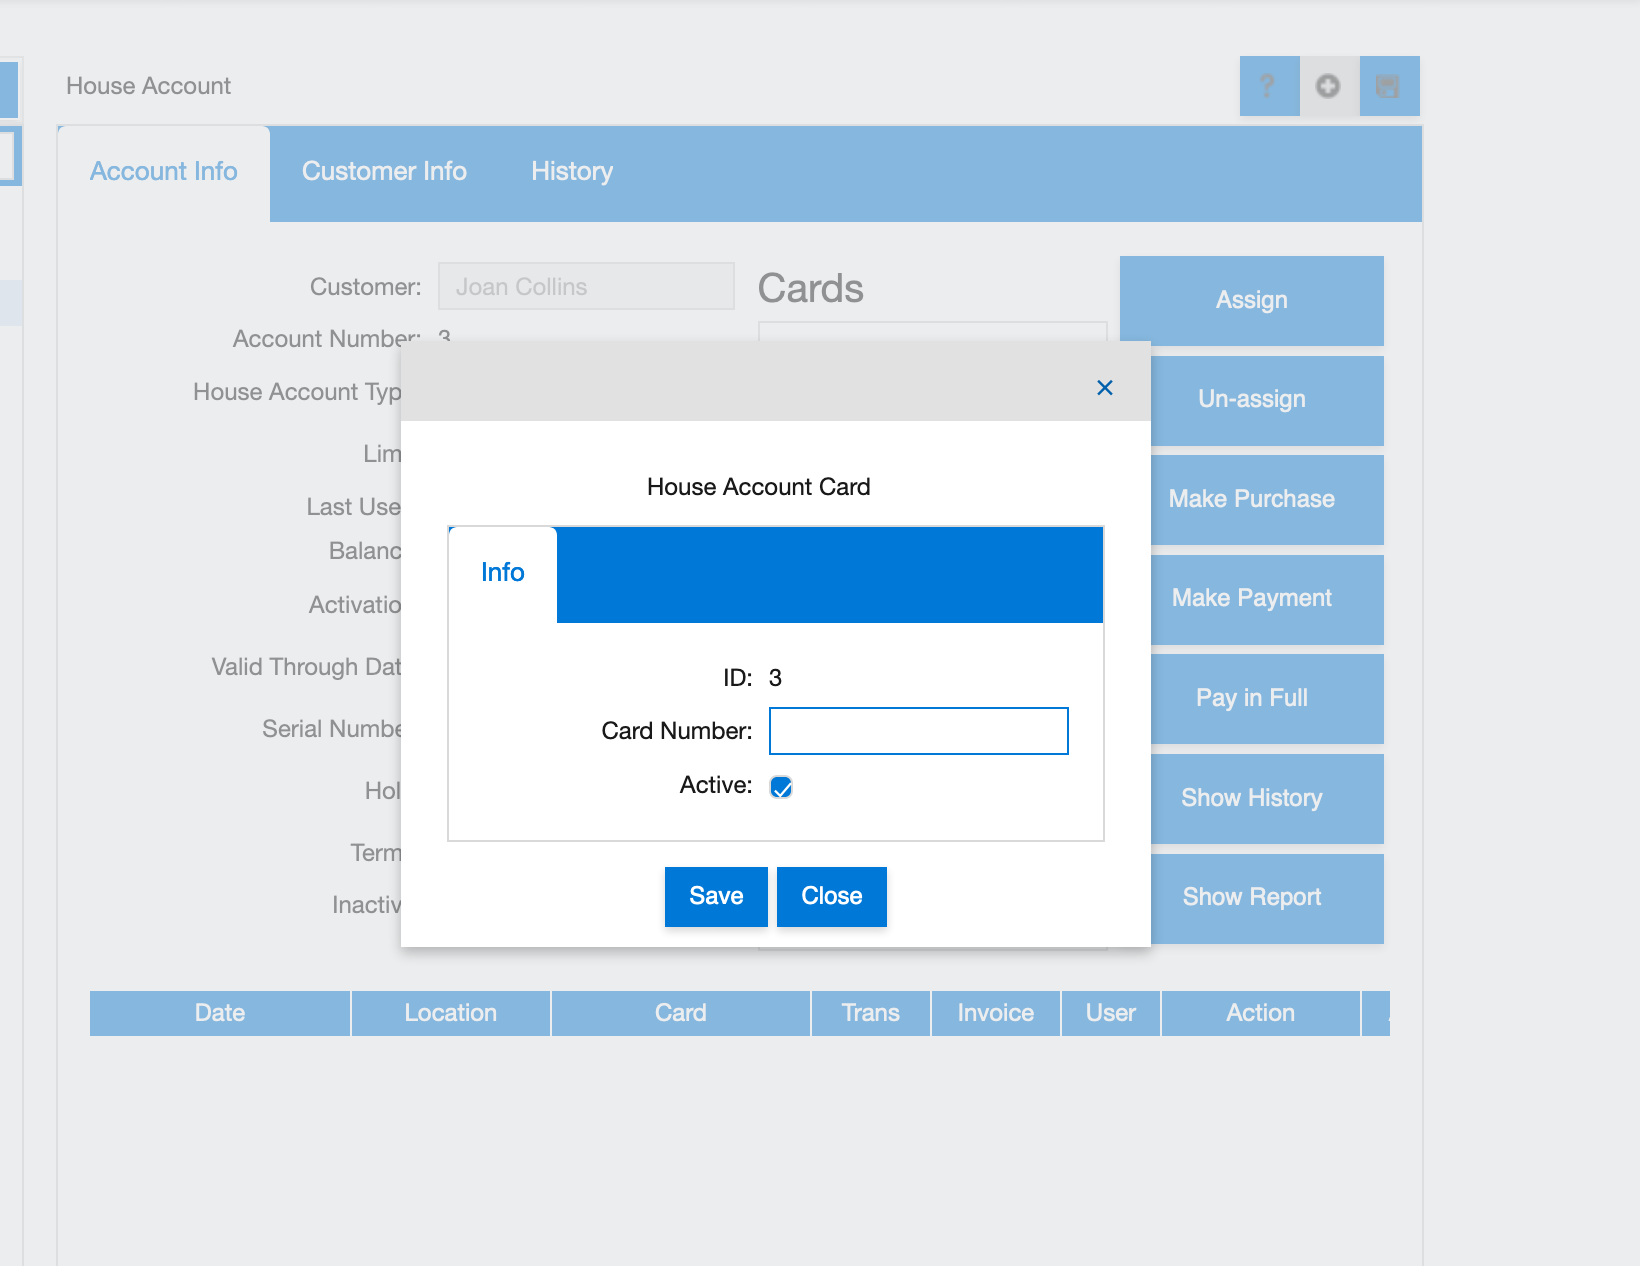
After each operation is performed, you will see a window with a message showing the result (i.e. CARD ASSIGNED, etc.).
Perform Transactions
You can perform transactions just like in Terminal through onemetrix by clicking on the transaction you want to perform on the tree, or locate the account, select a card number, and select the transaction on the panel. Enter the Card Number by either scanning or manually entering, enter the amount/tip (if applicable) and click Enter. Here is an example of making a purchase.
The result of the transaction will be displayed in a window with information from the transaction operation. Please see the section in oneMetrix Gift Card Setup for further details/screen shots.
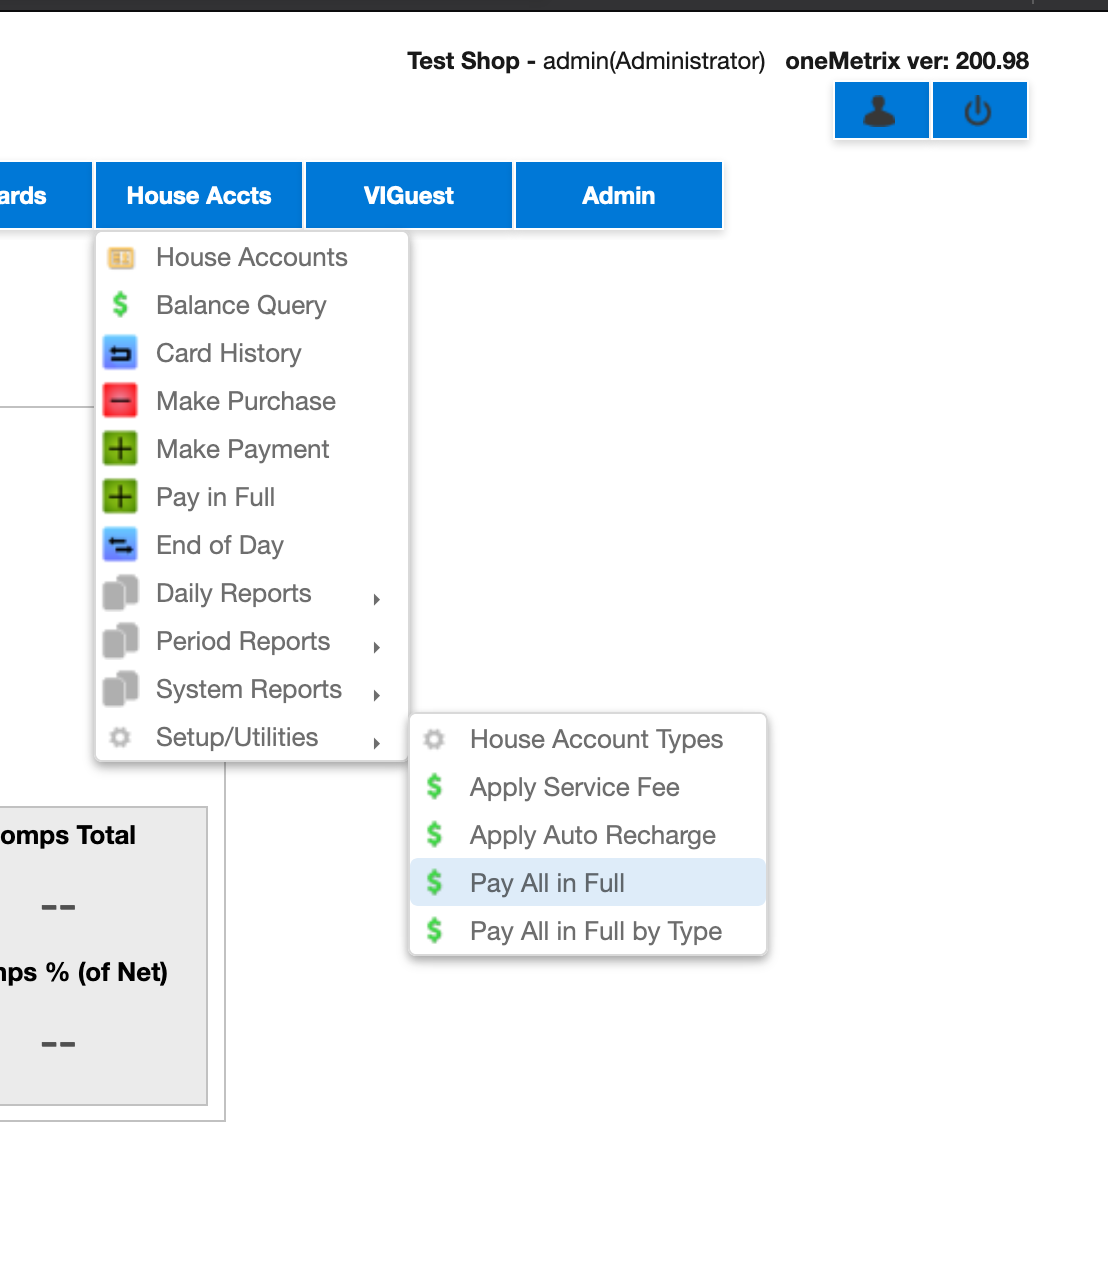
Utilities
There are several House Account utilities that can be executed from the Setup/Utilities menu. Apply Service Fee and Auto Recharge are described earlier in the Info section of this document: https://kb.onepos.com/docs/onemetrix-house-account-setup#section-info.
There are two other utilities, Pay All in Full and Pay All in Full by Type, that provide the ability to clear all house account balances. All account balances can be cleared, or the account balances can be cleared by type. These two tools will automatically reset all house account balances (or all house account balances of the selected type) to zero.
View Reports
In onemetrix there are several reports that you can view regarding the house accounts. There are transaction reports which show the transactions that occurred within a certain time frame specified by the user (Daily Trans, Period Trans, and Period Trans Summary). The Batch Details report will show all the transactions for a selected Batch ID. The Customer Statement report shows the transactions for a certain account and any balance due, like a bill that can be mailed to a customer. Activity reports show views of the account activity given a time period chosen. The Account and Account Card Reports show all or the store accounts for the site. Liability Reports show the outstanding balances of the accounts. Please see the section in oneMetrix Gift Card Setup for further details/screen shots.
You can also view the reports in a more colorful format through the Settings button at the top of the screen by selecting Settings->Report Settings->Decorated, and you can also view the reports in other formats than PDF. Right click on the tree the report you want to view, and select the format you want to view. We support PDF, HTML, Excel, and CSV. You can also print to a local printer from this menu.